Saturday, May 12, 2012

Express node to the Cloud

Within this post, I am going to give the steps to get a node application hosting the express framework up and running on the Cloud9 IDE.

  1. Sign up for a Cloud9 Account! It's very easy, simply go to cloud9ide.com, and click on the sign up button:
  2. Do all of the rigmarole for setting up the account, and eventually you will get to your Cloud9 Dashboard:
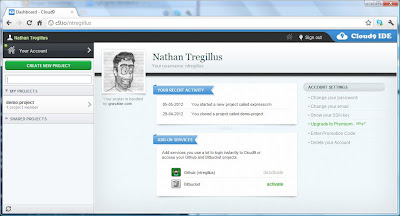
     
  3. Click the big green button on the left navigation pane, and select "Create a new Project," enter a project name, select your favorite source share/control site, and finally click the big green Create. I choose Git for this guide.
  4. The project will take a few seconds to clone:

    *note* if it takes longer than a few seconds, refresh your browser, I have noticed Cloud9 can hang up while cloning the project.
  5. Once the cloning is complete, select the project in the navigation pane, and within the edit pane, click the big green "Start Editing" button. It will open the project in a new window.

    *note* If you get a half loaded page, close the window, and click the "Start Editing" button again. I have notice the initial loading of the editor has some strange issues, probably due to caches not being loaded fast enough for the page or something to that effect. If you are still having issues, try clearing your browser cache, and running your browser in anonymous mode.
  6. We now run the following command in the console text box at the bottom of the IDE:

    npm install express

    You will see the package installation details in the console output, and if you refresh the project files navigation pane, you will now see a folder called node_modules, containing the express modules files.


    This just sets up the use of express module. One problem is that while we have installed express, we could just manually create all of the view controller crap, but lets get express to template all that out for us:
  7. Within the Program Files pane, drill into the node_modules\express\bin folder
  8. Double click the express file to open it in the editor pane.
  9. Click the Run button, and the form should auto populate with all of the details to execute the express site installer, EXCEPT the folder location you want to keep the site information in. I installed my site into ./DemandingDev :


    *note* if you are still unable to run the express site installer from the run pane, rename the express file to express.js. hopefully this work around will not have to be used for long. (per some great people on the cloud9 team, thank you!)
    We now have an express node app almost ready, BUT we still need to install dependencies. npm has an awesome feature to install all dependencies for you.

  10. To prepare for installing dependencies, run the following command to generate the json file describing all the dependent modules:

    npm init

    Command will generate a package.json file within your express project folder.
  11. Now we will change directories:

    cd [ExpressProjectFolder]

    Where [ExpressProjectFolder] is the name of your project.
  12. We now run the following command to install all the dependencies (AKA Jade templates module):

    npm install -d

    We have all the components now installed!
  13. And now the last step to get this express application up and running on cloud9. We need to change the hard coded setting from listening on port 3000, to use the port provided via the process.env.C9_PORT environmental property:


    With this port setting, we can debug the app.js file within your express project directory. Make sure it is the active file in the editing pane!

  14. Click the Debug button, then click the link that pops up in the command window:

You now have a functioning express node.js project up and running. I will periodically verify these steps work, and update this blog post if anything changes. Feel free to comment if you see a problem with my steps!

Saturday, May 5, 2012

Validation! So simple, yet so complicated (part 2)...

So lets discuss some more validation!

In my previous post, I discussed the last line of defense in your application, exceptions. throwing your own exceptions lets you as the developer say "Woah! I want to stop this before it fails spectacularly, leaving me an awful mess to clean up." 

Thats well and good, but the best solution is to integrate your validation as closely to the user input as possible. The faster a user know's what they are doing wrong, the better. That's where user experience development and basic input validation truly shine.

Microsoft gives you tools to do this in all of their frameworks:

  • ASP.net has a bunch of different techniques:
  • WPF can be directly integrated with your exception validation, but I would recommend using the IDataErrorInfo. here is a great article that describes how to implement this feature!
Lastly, the best way to solve strange validation issues is to design your UI in a way that naturally leads the user to enter valid input. Most call this the funnel of success, but a great place to read more about how to design a successful UI, I highly recommend reading Jakob Neilson's http://www.useit.com/ site. It may not look pretty, but it's content is exceptionally helpful when trying to understand why a radio button list might be better than a drop down list, or when you should decide what UI should be displayed.

Always keep validation of inputs in mind no matter what layer of an application you are working on, because whether your user is a PEBKAC mashing their face against a keyboard, or a brand new developer who just doesn't know how your library works, validation is the way we convey to them, hey, ID10T: Something is wrong.

Friday, November 19, 2010

Validation! So simple, yet so complicated (part 1)...

Guess this is going to be a two parter! in part I, I will be discussing how to protect your business logic by actively throwing exceptions when validating. in part II I will discuss the standard, more passive validation techniques not using exceptions.

When dealing with any class, you have values, and those values will be stored in a class within member variables. Those variables are usually basic data types, like strings, dates, integers, etc. For almost any member variable, there is a subset of all the potential values that datatype can contain that are actually valid.

Determining if a given value is within this subset of valid values is what validation is all about. In this blog post I will discuss an aspect of validation I do not believe is very clear; when to validate.

What I mean when I say "when to validate" I mean, when do you notify other parts of the code that the provided value is not within the acceptable subset of the provided data type. validation can occur:


When the value is assigned
This is usually done via a property or method that encapsulates the variable. The code attempts to provide a value to the class via it's property, and the property checks if its an acceptable value. If it is not an acceptable value, the code throws an exception describing why the value is invalid. Numerous objects use exceptions to reject invalid values. For example, when dealing with an index based collection, passing a negative index, will result in an IndexOutOfRangeException being thrown.

this sounds like a great answer for validation,  but it should be used as a last resort or make sure that your classes member variables are always within an acceptable value range. Methods the receive parameters or properties that are used in mission critical classes should always check if the values outside of what you'd expect be handled in this way. I consider these types of validations as Active Validation. Below are a list of existing exceptions you can use for active validation:

*note* This type of validation should be considered your LAST line of defense. Why? the very definition of exception is that at that point in the code, you have an exceptional scenario, you can't complete what the code is attempting to complete! this is the only place you should be dealing with a validation issue with an exception.


Tuesday, November 2, 2010

Data Access Finalized

So I've completed my data access library.  Instead of posting all the code here on the blog, and make it look oh so ugly, I've setup a code plex project. Feel free to pull it down from here!

http://demandingdev.codeplex.com/

Feel free to let me know if you like it, or think there should be any alterations. It currently only supports database access, but I hope to implement flat file and XML file access!

WPF ValidationTemplate

I've read a lot of different WPF validation articles, and I've come to my own conclusion that the most simple, but also flexible solution is to use the combination of the IDataErrorInfo interface on my business objects, and use converters and simple data type validators for data type conversions.


That being said, I've notice a significant number of example  classes have not implemented a very good ValidationTemplate! I've seen the following Binding statement in the majority of the binding template examples I've seen:


Path=(Validation.Errors)[0].ErrorContent


Can you see what is wrong with this statement? Its the index based access o the Errors collection! This type of binding won't effect the functionality. It will actually work fine, but if you watch the output window with the index accessing solution, you'll notice as soon as you enter a valid value (which should be most of the time!) an exception is getting swallowed by the WPF framework! (as shown below)

System.Windows.Data Error: 16 : Cannot get ‘Item[]‘ value (type ‘ValidationError’) from ‘(Validation.Errors)’ (type ‘ReadOnlyObservableCollection`1′). BindingExpression:Path=(0).[0].ErrorContent; DataItem=’TextBox’...

We can correct this simple flaw with the following correction:


Path=(Validation.Errors).CurrentItem.ErrorContent


This accesses the ObservableCollection of errors, and the CurrentItem property correctly passes a null, instead of throwing an index out of range exception.

Always keep in mind that WPF will swallow exceptions that are thrown while binding, but you can still see them within the output window while debugging!

Friday, October 1, 2010

Data Access Continued: Crud Parameter Attribute

In my last blog entry, I decided to pursue writing a data access component model. I have further defined some more requirements:

  • Classes of type T will be required to decorate their properties that are going to be considered as parameters within the ICrud<T> data access implementation. 
  • When applying this decorating attribute to a property, you will be required to provide the following values:
    • ParameterDirection: this will denote if the parameter should expect a value back after the CRUD operation was successful.
    • (Optional) ParameterName: the text used by the ICrud<T> implementation if the CRUD operation needs a different name for the value other than what the parameters base name.
That's enough about requirements! Below is the implementation of this definition!:


[AttributeUsage(AttributeTargets.Property, AllowMultiple=false, Inherited=true)]
public class CrudParameterAttribute:Attribute
{
    public const string NO_PARAMETER_NAME = "NoParameterName";
    /// <summary>
    /// defines what the Crud data access will interpret the property. 
    /// </summary>
    /// <remarks>
    /// regardless of the direction assigned, the read operations will 
    /// attempt to populate the property. Read operations will only 
    /// use parameters passed into the ICrud object via the 
    /// AddParameter method call.
    /// </remarks>
    public enum Direction 
    {
        /// <summary>
        /// Defines that the property will not be updated by the 
        /// ICrud object after a Create, Update, or Delete calls
        /// </summary>
        Input,
        /// <summary>
        /// Defines that the value within the decorated property
        /// can be effectively ignored for the Create, Update, 
        /// or Delete calls, but it will be populated when the
        /// operation is completed.
        /// </summary>
        Output,
        /// <summary>
        /// Defines that the parameter can be used by the ICrud object
        /// for supplying values, and will be updated after the Create,
        /// Update, or Delete operation is completed.
        /// </summary>
        Both
    }
    /// <summary>
    /// The name that the ICrud operation will used to identify the 
    /// property value uniquely
    /// </summary>
    public string ParameterName { get; private set; }

    /// <summary>
    /// Our way to effect how the ICrud implementation will 
    /// interpret this property
    /// </summary>
    public Direction ParameterDirection { get; private set; }

    /// <summary>
    /// Defines how this property will be interpreted as a parameter 
    /// within an ICrud implementation
    /// </summary>
    /// <param name="direction">
    /// If the property will be populated after an Update, Create, 
    /// or Delete
    /// </param>
    public CrudParameterAttribute(Direction direction)
    {
        this.ParameterDirection = direction;
        // denotes that the property name should be used
        this.ParameterName = NO_PARAMETER_NAME; 
    }

    /// <summary>
    /// Defines how this property will be interpreted as a parameter 
    /// within an ICrud implementation
    /// </summary>
    /// <param name="direction">
    /// If the property will be populated after an Update, Create,
    /// or Delete
    /// </param>
    /// <param name="parameterName">
    /// If the ICrud implementation should refer to the parameter 
    /// by another other than the properties existing name.
    /// </param>
    public CrudParameterAttribute(Direction direction, 
                                   string parameterName)
    {
        this.ParameterDirection = direction;
        this.ParameterName = ParameterName;
    }


}

Thursday, September 30, 2010

Incoming! ....awe Crud...

I don't know about any of you, but I've seen a lot of different data access components in the last couple years. Some people swear by ORM (Object Relational Mapping) suites like nHibernate, or use the Enterprise Library's data access application block. I've used both, but my experiences with both have been mixed.

So, I've decided, I'll write my own! My core concept I have in mind is that for every base business object, you should have an abstracted data access object. this object should handle all standard operations, such as Creating, Reading, Updating, and Deleting the given object (also known as CRUD). It should also provide the ability to get that object as a collection. Each of these methods can be provided additional parameters similar to how parameters are added to a command object. Once a CRUD call is made, the parameters are cleared, so that that new parameters can be added for the next call.

To define this concept, below is the interface describing what I expect any of these data access components to look like:


-----------------------------------------------
public Interface ICrud<T> where T:new()
{
    void AddParameter(string parameterName, object value);

    void Create(T objToInsert);

    void Read(T objToLoad);
    void Read(string customCommandName, T objToLoad);

    void Read(List<T> listToLoad);
    void Read(string customCommandName, List<T> listToLoad);

    void Update(T objToUpdate);

    void Delete();
}
-----------------------------------------------


I've already implemented the code base for an abstract version for SQL data access. But that is the next blog post!